Eclipse with CDT Plugin

Overview

Requirements

You need Eclipse and the CDT Plugin. On Windows systems you will also need a GNU compiler like MinGW. When you use MinGW you have to add the "MinGW/bin" path to your system or user environment path variable.

Using this library with Eclipse and CDT

First you have to create a new managed project and then follow the Installation instructions. After you copied the "jni.h" and "jni_md.h" files and refreshed your project, you have to add the jvm library.

Jvm library under Windows and MinGW

MinGW can not handle the "jvm.lib" file, but it needs a library against it can link. In the JDK there is no library file MinGW could use, so you have to create it by your own. But how? Therefore you need some MinGW tools, the "jvm.dll" file and the following batch file:
REM Written by Stefan Gruber 2005
ren libjvm.dll jvm.dll

pexports jvm.dll > templibjvm.def

echo off

del libjvm.def

for /f %%x in (templibjvm.def) do if %%x == JNI_CreateJavaVM (
   echo JNI_CreateJavaVM@12 >> libjvm.def
) else if %%x == JNI_GetDefaultJavaVMInitArgs (
   echo JNI_GetDefaultJavaVMInitArgs@4 >> libjvm.def
) else (
   echo %%x >> libjvm.def
)

del templibjvm.def

echo on

dlltool -k --input-def libjvm.def --dllname jvm.dll --output-lib libjvm.a

ren jvm.dll libjvm.dll
Copy this code and create a file with the extension ".bat" in your project folder. This batch file uses the "pexports" and the "dlltool" for creating the needed library.

What does this batch file do?
In the for loop some entries of the definition file are replaced, because otherwise the linker will not find the functions and you will get an error like this:
.../grubc/jnilib.c:164: undefined reference to `_imp__JNI_CreateJavaVM@12'
If you get such an error you only have to change the batch file by adding a replacement of the wrong entry or change an existing replacement. The use entries can be found in the "libjvm.def" file.
Copy the "jvm.dll" file into your project folder. Now you can start the batch file. After this batch file has finished the "jvm.dll" is renamed to "libjvm.dll" (it is important that there is no file in the project folder with the name "jvm.dll") and you have two new files: "libjvm.def" and "libjvm.a". The "libjvm.a" is the file you need. Now have to edit the project properties. Go to "C/C++ Build" and select "Libraries" in the "Tool Settings" tab. Enter "jvm" as Library and ".." as library search path like in figure 1. In the "Build Settings" tab you have to change the "Build command" to "mingw32-make" when you use MinGW.

cdt_windows.jpg

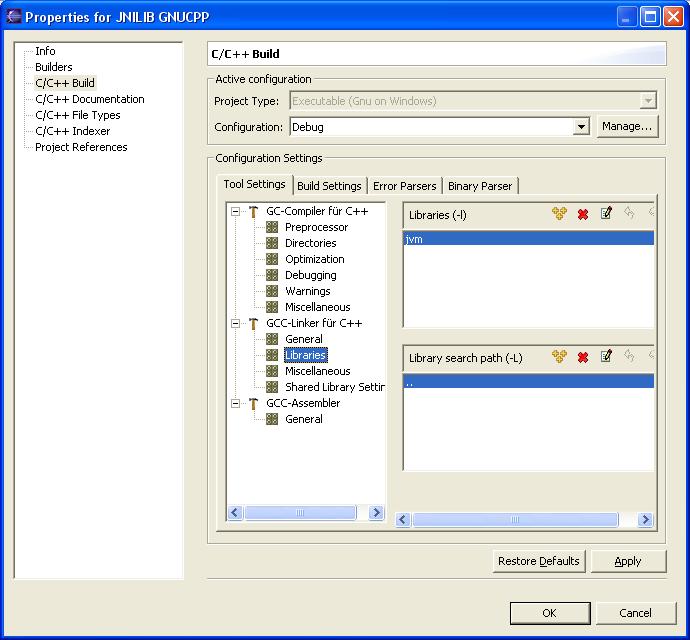
Figure 1: Project Settings for CDT on Windows systems

If you get an error when starting the program, have a look in the troubleshooting area at When I start the program I get the error: "Cannot find 'jvm.dll'"!.

Jvm library under Linux

Under Linux it is quite simple. You only have to edit the project settings. Go to "C/C++ Build" and select "Libraries" in the "Tool Settings" tab. Enter "jvm" as Library and the path of your java installation, which includes the "libjvm.so" file, as library search path like in figure 2.

cdt_linux.jpg

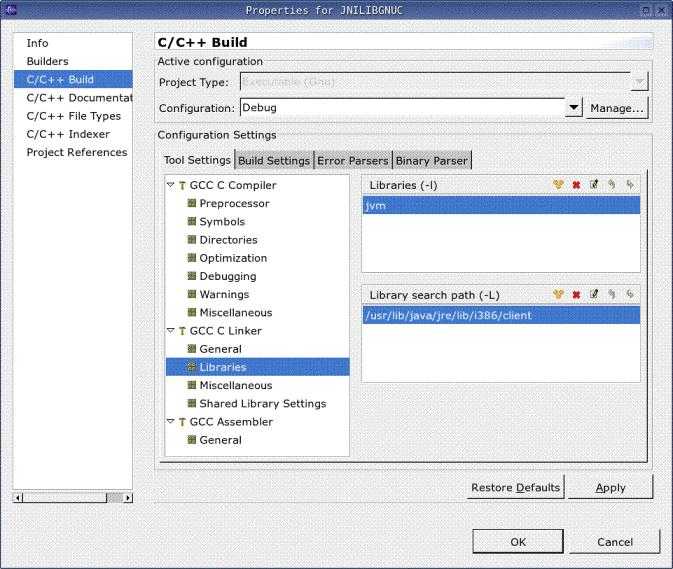
Figure 2: Project Settings for CDT on Linux systems

If you get an error when starting the program, have a look in the troubleshooting area at When I start the program I get the error: "Cannot find 'libjvm.so'"!.

Jvm library under Mac OS X

Under Mac OS X you have to change your projects settings this way: Go to "C/C++ Build" and select "Libraries" in the "Tool Settings" tab. Enter "jvm" as Library and the path of your java installation, which includes the "libjvm.dylib" file, as library search path like in figure 3. After that you have to got to "Miscellaneous" and type "-framework JavaVM" into the "Linker Flags" field like in figure 4.

cdt_mac_libs.jpg

Figure 3: Library project Settings for CDT on Mac OS X systems

cdt_mac_misc.jpg

Figure 4: Miscellaneous project Settings for CDT on Mac OS X systems


Generated on Sat Nov 19 14:11:17 2005 for GrubC by  doxygen 1.4.4